


Winter winds whistle through unseen cracks, and summer heat seems to bake your home despite the AC running full blast. Sound familiar? Inefficient insulation is often the culprit behind uncomfortable homes and sky-high energy bills. While many insulation types exist, fiberglass remains a popular choice for its effectiveness, availability, and relative ease of installation for the determined DIYer.
Installing fiberglass insulation is a project that can significantly improve your home’s energy efficiency, comfort, and even soundproofing. It’s a job that requires careful planning, attention to safety, and patience, but the rewards in terms of lower utility bills and a more comfortable living environment are substantial. This comprehensive guide will walk you through everything you need to know to confidently tackle installing fiberglass insulation in your home.
Why Insulate? The Unsung Hero of Home Comfort and Efficiency
Before diving into the how-to, let’s quickly recap why insulation, particularly fiberglass, is such a crucial component of a well-maintained home:
- Energy Savings: This is the most significant benefit. Insulation acts as a barrier to heat flow. In winter, it keeps warm air inside, preventing it from escaping. In summer, it keeps hot air out, reducing the load on your air conditioning. This leads directly to lower heating and cooling costs – a win for your wallet and the planet.
- Improved Comfort: Say goodbye to cold drafts and uneven temperatures. Proper insulation creates a more consistent and comfortable indoor climate throughout the year. Rooms that were once too hot or too cold become usable and pleasant.
- Noise Reduction: Fiberglass insulation can also help absorb sound, reducing noise transmission between rooms and from the outside world.
- Environmental Impact: By reducing energy consumption, you decrease your home’s carbon footprint.
Is DIY Fiberglass Installation Right for You?
While installing fiberglass insulation batts or rolls is often considered a manageable DIY project, it’s essential to honestly assess your capabilities and the scope of the work.
- Consider Your Skill Level: Are you comfortable with basic tools like utility knives and staple guns? Can you work safely in potentially awkward or confined spaces (like attics or crawl spaces)?
- Evaluate the Project Complexity: Insulating an unfinished attic is typically more straightforward than insulating existing finished walls or a damp crawl space. Complex jobs involving significant structural changes or dealing with moisture issues are often best left to professionals.
- Time Commitment: Insulating even a small area takes time and effort. Ensure you have dedicated time to complete the project safely and effectively.
If you’re tackling a large area, a particularly challenging space, or dealing with issues like mold or excessive moisture, getting a professional quote is always a wise idea.
Understanding Fiberglass Insulation: Types and R-Value
Fiberglass insulation comes in a few primary forms, each suited for different applications:
- Batts and Rolls: This is the most common type for DIYers. Batts are pre-cut sections, while rolls are longer continuous blankets. They are designed to fit standard spacing between studs, joists, and rafters (typically 16 or 24 inches on center). They come in various thicknesses to achieve different R-values.
- Loose-Fill (Blown-In): This type consists of small, lightweight fibers blown into cavities using specialized equipment. It’s excellent for filling irregularly shaped spaces, existing walls (requiring holes to be drilled), and adding insulation over existing material in attics. While bags of loose-fill are available, renting a blower machine is necessary for installation, making it slightly less common for small DIY projects compared to batts.
- Rigid Foam Boards: While not fiberglass, these are often used in conjunction with or instead of fiberglass in certain applications like foundation walls or exterior sheathing.
What is R-Value?
R-value is a critical concept. It stands for “Resistance value” and measures the insulation’s ability to resist heat flow. A higher R-value indicates better insulating performance. The appropriate R-value for your project depends on several factors:
- Climate Zone: Colder climates require higher R-values. The U.S. Department of Energy provides recommendations based on climate zones.
- Location in the Home: Attics typically require a higher R-value than walls or floors because hot air rises and is a major source of heat loss/gain.
- Existing Insulation: You may be adding to existing insulation to reach a recommended R-value.
Check local building codes as they often specify minimum R-value requirements for different parts of the house.
Faced vs. Unfaced Fiberglass Insulation
Fiberglass batts and rolls come in two main varieties:
- Faced Insulation: Has a paper or foil facing on one side. This facing often serves as a vapor barrier, preventing moisture vapor from migrating into the wall cavity where it could condense and cause problems. In cold climates, the faced side should generally face the heated side of the structure (e.g., towards the interior of a wall).
- Unfaced Insulation: Has no facing. It’s used where a vapor barrier is not needed or where a separate plastic sheeting is being installed as the vapor barrier. Unfaced insulation is often used as a second layer over existing faced insulation in attics.
Using the correct type of facing (or no facing) and installing it correctly is crucial for preventing moisture issues within your walls or attic.
Safety First: Your Non-Negotiable PPE
Working with fiberglass insulation releases tiny glass fibers into the air and onto surfaces. These can cause skin irritation, eye discomfort, and respiratory issues if inhaled. Wearing appropriate Personal Protective Equipment (PPE) is NOT optional.
Before you even open a package of insulation, gather the following:
- Heavy-Duty Work Gloves: To protect your hands from irritation.
- Long-Sleeve Shirt and Long Pants: Wear loose-fitting clothing that covers all skin. Tuck your shirt into your pants and pant legs into your socks. You can even tape the junctions to prevent fibers from sneaking in.
- Eye Protection: Goggles or safety glasses that seal around your eyes are essential to prevent fibers from getting in.
- Respiratory Protection: A well-fitting dust mask is the minimum, but a disposable respirator (N95 or better) is highly recommended, especially in poorly ventilated spaces like attics or crawl spaces.
- Head Covering: A hat or hood can prevent fibers from getting in your hair.
- Duct Tape: Useful for sealing clothing junctions.
Have cleanup materials ready before you start.
Tools and Materials You’ll Need
Beyond your PPE, here’s a list of common tools and materials for installing fiberglass batts or rolls:
- Fiberglass insulation batts or rolls (calculate the square footage of the area to be insulated, subtract significant openings, and buy a little extra for cuts and waste).
- Utility knife or a specialized insulation knife (sharper is better for clean cuts).
- Straightedge (a piece of scrap wood or drywall works well).
- Measuring tape.
- Staple gun and staples (for faced insulation).
- Plastic sheeting (if a separate vapor barrier is required).
- Caulking gun and appropriate caulk or expanding foam sealant (for air sealing).
- Work light (essential for dark attics or crawl spaces).
- Plywood or sturdy boards (to create safe walkways across attic joists – NEVER step directly on drywall ceilings!).
- Garbage bags or heavy-duty contractor bags for scraps.
- Marker.
- Knee pads (your knees will thank you).
Step 1: Prepare the Area
Proper preparation is key to a successful and effective insulation job.
- Clear the Space: Remove any debris, old insulation (if necessary – this can be messy and may require professional handling if it contains vermiculite or shows signs of mold/pest infestation), or stored items from the work area.
- Air Seal, Air Seal, AIR SEAL! Insulation slows heat transfer through materials, but it doesn’t stop air flow. Air leaks can undermine your insulation efforts, letting conditioned air escape and unconditioned air enter. Before installing insulation, seal all significant air leaks:
- Around pipes, vents, and electrical wires penetrating walls, floors, or ceilings.
- Around window and door frames.
- Where walls meet floors and ceilings.
- Around electrical boxes and light fixtures (use fire-rated caulk or gaskets around fixtures in ceilings below unconditioned spaces). Use caulk for smaller gaps and expanding foam for larger ones.
- Address Moisture Issues: Never insulate over moisture. Identify and fix any leaks (roof, plumbing) or sources of dampness before installing insulation. Insulation can trap moisture, leading to mold, rot, and reduced effectiveness. Ensure proper ventilation, especially in attics and crawl spaces, to manage moisture levels.
- Plan Your Path (Attics): If working in an attic, lay down plywood or sturdy boards across the joists to create a stable work platform and avoid stepping through the ceiling below. Plan your movements carefully.
Step 2: Measure and Cut the Insulation
Fiberglass batts are designed to fit snugly between framing members (studs, joists, rafters).
- Measure the Cavity: Measure the width of the cavity between the framing members. Standard spacing is 14.5 inches for 16-inch on-center framing and 22.5 inches for 24-inch on-center framing. Also measure the length of the cavity.
- Cut to Size: Unroll or lay out the fiberglass batt on a flat, scrap surface (like a piece of plywood or cardboard). Use your measuring tape and a straightedge to mark the desired length. Cut the insulation using a sharp utility knife or insulation knife. Cut the batt slightly wider (about 0.5 to 1 inch) than the cavity width. This ensures a snug fit that stays in place and prevents gaps. Compress the insulation along the straightedge as you cut. Never cut directly on a finished surface.
- Cutting Around Obstacles: This is where precision is needed. When encountering electrical boxes, pipes, or wires, carefully cut the insulation to fit around them. DO NOT compress or stuff insulation tightly around these obstacles. Compressed insulation loses R-value. Slit the batt lengthwise if needed to fit around wires, or cut out sections to go around boxes, ensuring the cut pieces fit snugly on either side.
Related: Does Ac Waste Gas
Step 3: Install the Insulation
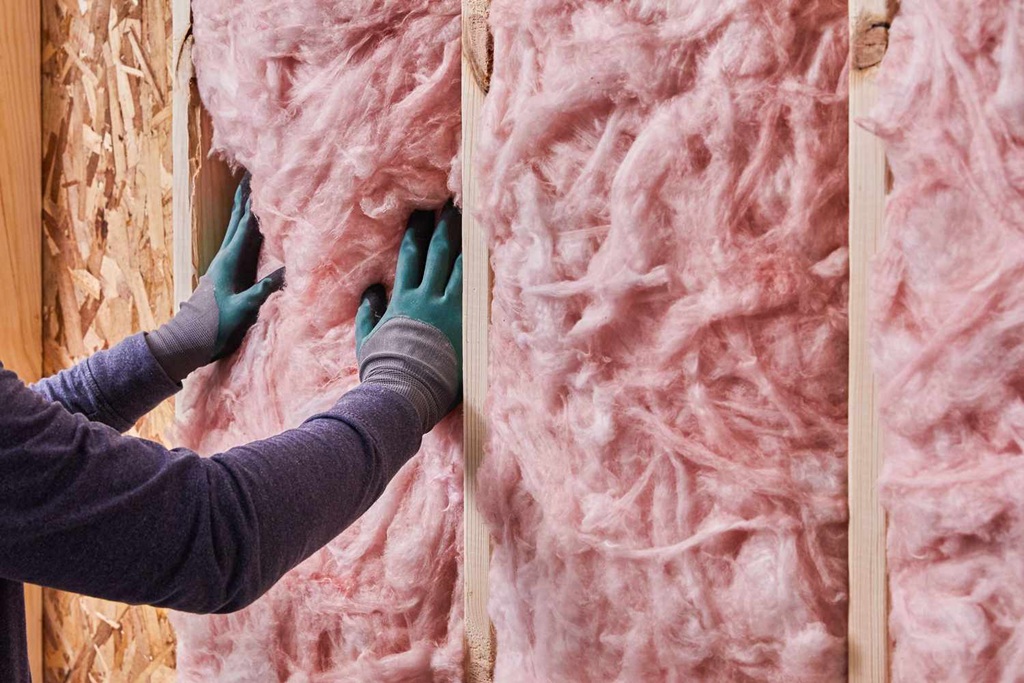
Now, it’s time to place the cut insulation into the cavities.
- Place the Batt/Roll: Gently push the insulation into the cavity between the framing members. Ensure it fills the entire depth of the cavity without being compressed or leaving significant gaps. It should be a snug fit against the sides of the studs, joists, or rafters.
- Facing Direction (if applicable): If using faced insulation in a cold climate, ensure the vapor barrier facing is installed towards the heated side of the assembly (e.g., towards the interior living space in an exterior wall or ceiling below an unheated attic). In hot, humid climates, the vapor barrier might be placed on the exterior side, or not used at all depending on local building codes and climate specifics – always check local requirements.
- Staple the Facing (if applicable): If the faced insulation has stapling flanges (paper edges extending from the batt), use a staple gun to staple these flanges to the sides or faces of the studs/joists every 8-12 inches. This holds the insulation in place and creates a continuous vapor barrier plane. Ensure the facing is smooth and not ripped.
- Work Around Obstacles: As mentioned earlier, carefully fit the insulation around pipes, wires, and electrical boxes. Avoid compressing the insulation. Cut and fit pieces neatly.
- Fill All Cavities: Continue measuring, cutting, and installing insulation in all open cavities, including smaller spaces and rim joists (the framing members around the edge of floor systems).
- Layering (Attics): If adding a second layer of unfaced insulation in an attic, lay it perpendicular to the first layer of joists to cover the joists themselves and minimize thermal bridging.
Step 4: Specific Considerations for Different Areas
- Walls: Ensure insulation is friction-fit snugly between studs. Address insulation around windows and doors. Ensure electrical boxes are sealed and insulation is cut to fit around them without compression.
- Attics: Ensure soffit vents are not blocked by insulation. Use baffles (ventilation channels) to maintain a clear path for airflow from the soffit to the ridge vent. Insulate sloped ceiling areas (cathedral ceilings) carefully, ensuring an air gap is maintained behind the insulation for ventilation. Cover the top plates of walls below the attic.
- Crawl Spaces: If insulating the floor above a crawl space, install batts snugly between joists. You may need wire hangers or netting to hold the insulation in place. If insulating crawl space walls, use appropriate rigid foam or fiberglass batts designed for that application and ensure a ground vapor barrier is in place to control moisture from the soil.
Step 5: Finishing Up
Once all the insulation is installed:
- Inspect Your Work: Look for any gaps, voids, or areas where the insulation is compressed. Adjust or add small pieces as needed to ensure full coverage.
- Clean Up: Carefully gather all scraps and place them in heavy-duty garbage bags. Seal the bags before removing them from the work area. Fiberglass can make a mess, so be thorough. You may want to vacuum the area with a shop vac (not your household vacuum) equipped with a HEPA filter.
- Clean Yourself: Remove your work clothes before entering the main living areas of your home. Wash your work clothes separately. Shower immediately after working with fiberglass to remove any fibers from your skin.
Related: The Ultimate Guide to Heating Greenhouse: Tips and Techniques
Common Mistakes to Avoid
- Compressing the Insulation: This is a major efficiency killer. Compressed fiberglass loses significant R-value.
- Leaving Gaps and Voids: Even small gaps allow air leaks and reduce the overall effectiveness of the insulation. Fit insulation snugly.
- Blocking Ventilation: Especially critical in attics. Ensure airflow from soffit to ridge is maintained.
- Ignoring Air Sealing: Insulation alone is not enough. Seal air leaks before insulating.
- Not Wearing PPE: Seriously, don’t skip the safety gear.
- Installing Faced Insulation Incorrectly: Ensure the vapor barrier is on the correct side for your climate zone.
- Working in Damp Conditions: Address moisture issues before insulating.
When to Call a Professional
Don’t hesitate to call in the experts if:
- The area to be insulated is very large or difficult to access.
- You are dealing with complex framing or structural issues.
- There is existing mold, pest infestation, or significant moisture problems.
- You plan to use blown-in insulation (which requires special equipment).
- You are uncomfortable working in tight or dusty spaces.
Related: How to Install Corrugated Metal Roofing: A Step-by-Step Guide
Conclusion
Installing fiberglass insulation is a tangible way to invest in your home’s comfort and efficiency. By understanding the basics, prioritizing safety, preparing your workspace meticulously, and following the installation steps carefully, you can successfully complete this rewarding DIY project. The effort you put in will be repaid year after year through lower energy bills and a home that feels more comfortable regardless of the weather outside. So, gather your gear, plan your attack, and get ready to master the chill (and the heat!) in your home.