


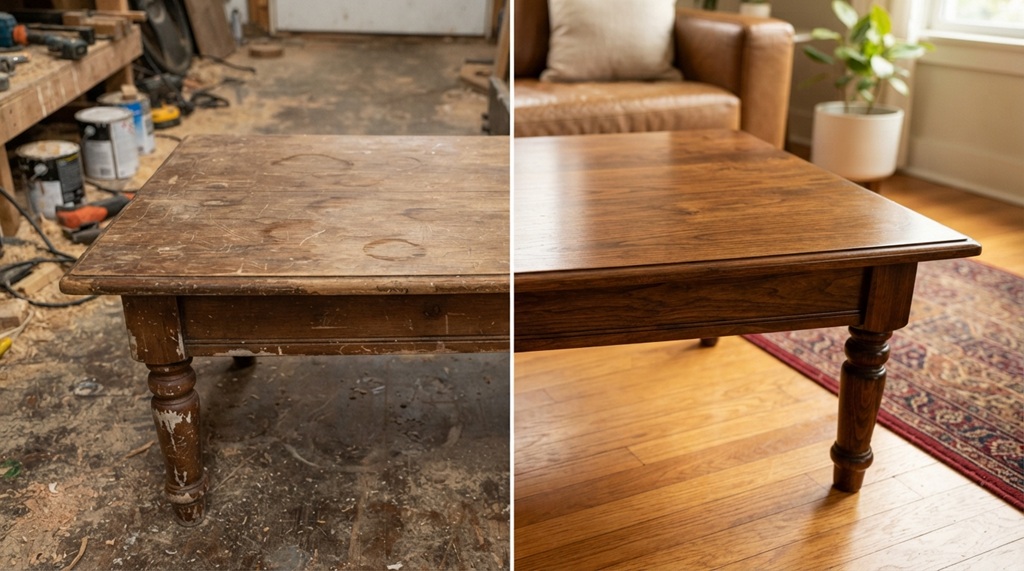
Restoring old wooden furniture means cleaning, repairing, stripping, and refinishing a piece so it looks and functions like new while keeping its original character. The process typically takes a weekend for small pieces and involves basic tools most people already have at home. You don’t need a workshop full of equipment or years of woodworking experience just patience, the right materials, and a willingness to work in stages rather than rush the job.
A lot of guides make furniture restoration sound more complicated than it is, which stops people before they even start. In reality, most old furniture dressers, chairs, tables, cabinets follows the same basic restoration sequence. Once you understand that sequence, you can apply it to almost any solid wood piece you find at a thrift store, inherit from family, or pull out of storage.
This guide walks through the exact process professionals use, including a few details most articles skip, like how to tell if a piece is even worth restoring before you invest time in it.
How to Tell if a Piece of Furniture Is Worth Restoring

Not every old piece deserves the effort check for solid wood construction and structural soundness before starting any restoration work. If the furniture is made from particleboard, veneer over MDF, or has water-damaged internal structure, restoration usually costs more time than the piece is worth.
Signs it’s worth restoring:
- The frame is solid wood (tap it – solid wood sounds dense, particleboard sounds hollow)
- Joints are loose but intact, not broken or missing pieces
- Surface damage is cosmetic (scratches, dull finish, water rings) rather than structural
- Drawers slide and doors close, even if stiffly
Signs to walk away or budget for major repair:
- Soft, crumbly wood (often a sign of rot or long-term water damage)
- Warped panels that no longer sit flat
- Extensive insect damage, especially active infestations
A quick way to check construction quality on an unfamiliar piece: pull out a drawer and look at the joinery. Dovetail joints (interlocking triangular notches) usually indicate older, better-built furniture worth the restoration effort. Stapled or glued butt joints often signal mass-produced furniture that may not hold up to a full refinish.
Gathering the Right Tools and Materials
You need cleaning supplies, a stripping agent, sandpaper in multiple grits, wood glue, and a finish product most of which are available at any hardware store. Buying cheap sandpaper or a low-quality stripper is the most common mistake beginners make, since it adds hours of extra work for a worse result.
Basic Tool List
- Mild soap and soft cloths for initial cleaning
- Chemical paint/varnish stripper or a heat gun (for stripping old finish)
- Plastic or metal scraper (a plastic putty knife works well and won’t gouge wood)
- Sandpaper: 80-grit (heavy removal), 120-grit (smoothing), 220-grit (final finish)
- Wood glue and clamps (for loose joints)
- Wood filler or epoxy putty (for cracks and gouges)
- Stain, if you want to change or restore the wood color
- Sealant: polyurethane, tung oil, or wax, depending on the look you want
- Rubber gloves, a respirator mask, and eye protection
A detail many guides leave out: buy a tack cloth. It’s a slightly sticky cloth designed to pick up fine sanding dust before staining, and skipping this step is one of the biggest reasons DIY stain jobs come out blotchy or gritty. Wiping with a regular rag just pushes dust around instead of lifting it off the surface.
Cleaning and Prepping the Surface
Start by wiping the piece down with mild soap and water to remove surface grime, wax buildup, and years of dust before you assess what’s underneath. This step matters because dirt and old wax can hide the true condition of the wood, and skipping it often leads to uneven stripping later.
Use a soft cloth and a mixture of dish soap and warm water avoid soaking the wood, since excess moisture can raise the grain or loosen old glue joints. For stubborn grime or wax buildup, mineral spirits on a cloth will cut through it without damaging bare wood. Let the piece dry fully, ideally for 24 hours, before moving to the next stage.
This is also the point where you should assess: is the existing finish worth keeping, or does the whole piece need to be stripped down to bare wood? If the finish is mostly intact with just a few scratches or dull spots, you may be able to skip full stripping and go straight to light sanding and refinishing saving significant time.
Stripping Old Paint or Varnish
Stripping removes the old finish down to bare wood so new stain or sealant can properly absorb, and it’s necessary whenever the existing finish is cracked, peeling, or too thick to sand through. Apply a chemical stripper according to the product’s instructions, let it sit until the finish bubbles or softens, then scrape it away with a plastic scraper working with the grain.
Two methods dominate this step: chemical strippers and heat guns. Chemical strippers work well on detailed or carved surfaces where a heat gun’s direct flame risk is harder to control, but they involve stronger fumes and require good ventilation. Heat guns work faster on flat surfaces and produce less chemical waste, but they carry a real risk of scorching the wood if held in one spot too long.
A safety note that’s easy to overlook: if the furniture predates 1978, there’s a real chance the original paint contains lead. According to industry experts and public health guidance, testing older painted furniture with a lead test kit before sanding or heat-stripping is worth the few extra minutes, since dry-sanding lead paint releases harmful dust into the air.
After stripping, wipe the surface with mineral spirits to remove any residual stripper before it dries into the wood grain.
Pre-Refinishing Repairs: Restoring Structural Integrity First
Loose joints, deep cracks, and missing wood must be fully repaired prior to sanding or refinishing, as post-finish corrections seldom blend seamlessly and remain prone to failure under structural stress. While standard wood filler excels at concealing shallow scratches and surface gouges, high-strength epoxy putty provides the necessary durability to rebuild missing fragments and bridge larger gaps. Once your masterfully restored piece is cured and complete, strategic placement becomes paramount—weave it seamlessly into your home using on arrange living room furniture for maximum space to transform your refinished masterpiece into an uncluttered focal point.
Fixing Loose Joints
Loose joints are the most common structural issue in old furniture, especially chairs. Remove the joint if possible, scrape out old dried glue, apply fresh wood glue, and clamp it tightly for the time specified on the glue label usually 24 hours. Rushing this step is why so many “restored” chairs wobble again within months.
Filling Cracks and Gouges
For cracks, press wood filler in firmly with a putty knife, slightly overfilling since it shrinks a bit as it dries. Sand it flush once fully cured. If you plan to stain the piece rather than paint it, look for a filler labeled as stainable, since standard wood filler often doesn’t absorb stain the same way as the surrounding wood and leaves visible patches.
Replacing Missing Hardware
Original hardware hinges, drawer pulls, knobs is often worth keeping even if it looks rough, since it can usually be cleaned and polished rather than replaced. Soaking metal hardware in a mixture of vinegar and baking soda, then scrubbing with an old toothbrush, removes tarnish without damaging the original finish underneath.
Sanding the Wood Properly

Sand progressively from coarse to fine grit, always moving with the wood grain, to create a smooth surface that will absorb stain or sealant evenly. Start with 80-grit sandpaper to remove any remaining old finish or rough patches, move to 120-grit to smooth the surface further, then finish with 220-grit for a soft, ready-to-finish feel.
Sanding against the grain even briefly creates tiny scratches that become very visible once stain is applied, since stain settles into scratches and darkens them more than the surrounding wood. This is one of the most common mistakes among first-time restorers, and it’s usually not fixable without going back a full grit level.
Use a sanding block on flat surfaces to keep pressure even; hand-sanding without one tends to create slight dips, especially on tabletops. For curves, carvings, or tight corners, a folded piece of sandpaper or a detail sanding sponge gets into areas a block can’t reach.
Once sanding is complete, vacuum the surface first, then go over it with a tack cloth to lift every trace of fine dust. Skipping this step is the single most common cause of a gritty, uneven stain finish.
Staining and Sealing for a Professional Finish
Apply stain evenly with the grain using a clean cloth or brush, wipe off excess after a few minutes, then seal with a protective topcoat once the stain is fully dry. The look you’re after determines your product choice: oil-based stains penetrate deeper and bring out more grain detail, while gel stains sit more on the surface and work well on furniture with blotchy or inconsistent wood.
A step most guides skip: test your stain on a hidden section first the underside of a drawer, or the inside of a leg since the same stain color can look noticeably different depending on the specific wood and how it absorbed during sanding. Committing to a full piece without testing is how a lot of restoration projects end up a shade darker or more uneven than expected.
After staining, apply a sealant to protect the wood. Polyurethane offers strong, durable protection and comes in matte, satin, or glossy finishes, making it a solid choice for tables and surfaces that see daily use. Tung oil and wax finishes give a softer, more natural look and are easier to touch up later, but they offer less protection against water and heat than polyurethane. Apply thin, even coats, sanding lightly between coats with fine-grit paper for the smoothest possible result.
Frequently Asked Questions
How long does it take to restore a piece of old wooden furniture?
Small pieces like chairs or side tables typically take a weekend, factoring in drying time between steps. Larger pieces like dressers or dining tables can take one to two weeks when you account for stripping, repairs, staining, and multiple coats of sealant with drying time between each.
Can I restore furniture without stripping off the old finish?
Yes, if the existing finish is in decent condition with only minor scratches or dullness, light sanding followed by a fresh coat of sealant can refresh the piece without a full strip. Full stripping is only necessary when the finish is cracked, peeling, or too thick to sand through evenly.
Is it better to stain or paint old furniture?
It depends on the wood quality and the look you want. Staining works best on furniture with attractive natural grain, while painting is a good option for pieces with mismatched wood tones, heavy repairs, or less desirable grain patterns you’d rather cover up.
Do I need to remove all the old stain before applying a new color?
Not always; going darker generally doesn’t require full stripping, since new stain can layer over old color. Going lighter, however, usually requires stripping or heavy sanding, since stain can’t be “removed” by applying more stain on top.
What’s the biggest mistake beginners make when restoring furniture?
Skipping proper drying and curing times between steps is the most common issue, since rushing glue, stain, or sealant leads to weak joints, blotchy color, or a tacky finish that never fully hardens. Following the recommended wait times on product labels, even when it feels slow, makes the biggest difference in the final result.
Final Thoughts
Restoring old wooden furniture comes down to following the process in order: assess the piece, clean it, strip if needed, repair structural issues, sand progressively, then stain and seal. Skipping steps or rushing the drying times is what separates an amateur-looking result from a professional one not the tools you use or how much experience you have.
Start with a smaller, less sentimental piece if this is your first restoration project. It’ll teach you how your specific tools and products behave before you take on something you really can’t afford to get wrong.